Wednesday, July 29, 2015

Peace Puzzle Print: Lulu's Inspiration

It is definitely time to start up this blog again!

Through the years, I have participated in several huge woodblock puzzle print projects coordinated and put together by artist and woodblock friend Maria Arango.  For more info on this, visit her blog, http://1000woodcuts.blogspot.com.  And look at her work, she is an amazing artist!

The theme this time around is Peace.

Wanting to find a take on the theme that is very close to home, I knew that one or both of my cats (named Natalia and Lulu) would surely be an inspiration.  Natalia actually would have been the more obvious choice, as her nature is so mellow and peaceful, but when I got ready to draw, Lulu was so peacefully dreaming on her favorite cardboard scratcher that I decided that she would be the inspiration this time. 

And, I think there is something interesting too, about having the peacefulness of the image, while knowing that the cat may well be dreaming of future mischief or escapades.

I did the drawing in simple pencil.  I generally use either pencil or brush and ink for the source drawings for my woodcuts.  Following is the drawing that resulted. I wanted to keep it minimal, striving for the simple grace of the pose.

 Of course, in doing a woodcut, I needed to reverse the image, so I scanned it, flipped the image and then transferred it to the block by drawing over the printout of the reversed image with carbon paper underneath (you can still find carbon paper at some stationery stores!).

The wood is cherry so it really holds the line really well.  It is a hard wood, though, so takes some more elbow grease in the carving. 
I knew because of the shape of the image, it would have a lot of space around it on the block, but that was fine with me, and seemed to fit with the theme as well.  Below is the carved block:

Before I sent the block back to Maria, I wanted to do some rubbings of the image.  I use a big, soft-ish colored pencil, pigment stick, crayon or something along those lines to do woodblock rubbings.  You simply place paper over the block and rub where the lines are.  It is helpful to get an idea of how it will print, and I like the rough look of the rubbing in itself, even though it is the reverse of my original image, so I made a few rubbings before sending the block on its return journey to join the rest of the puzzle.
I titled this print "Resting Mischief".  The blurb which will accompany it in the book about the Peace Puzzle Print is:

"The title of my image is "Mischief at Rest".  It is inspired by Lulu, who is one of my two dear formerly-feral kitties. Her sister Natalia is the philosopher, while Lulu is more the playful jester. A peaceful moment dreaming of her next adventure:)"

Thanks to Maria for putting this project together, and I look forward to seeing the finished print!! Do check out her blog to find out more about it:)

Monday, March 18, 2013

Solarplates and Snakes: Birth of the Puppysnake

2013 is the Year of the Snake.  I have been a member of a woodblock printmaking group, Baren (http://barenforum.org), for many years, and every year we do a print exchange for the appropriate animal of the year according to the Chinese zodiac.  Though the group is indeed a woodblock group, for the New Year's exchange we can use any form of printmaking we like, which gives a lot more flexibility (which I like!). 
 
Being a person who is much more in tune and connected with furry creatures than with scaly ones, when I started thinking about what I was going to do for year of the snake, I was coming up blank at first.  I love the shapes that snakes can get into, and the patterns, but I just wasn't seeing an image in my head.  We have been doing this print exchange for so many years, this is actually the second time I was faced with this challenge.  The first time, I did a print with the snakes forming shape of a champagne glass, as seen below (this is a hand-colored woodblock print).


I wanted to do something different this time. I started thinking about my series of hybrid animals (you can see many of these on my site, http://sarahhauser.neoimages.net).  Some of these are comprised of one type of animal that is stereotypcally thought of as dangerous, put together with an animal which epitomizes warm and fuzzy.  I began to imagine a new type of snake.... 
 
Thus, the Puppysnake was born.  It took a few tries to figure out what angle I wanted to show him in, and this is what I ended up with, wanting to show the exuberance of the puppy in the front, coming to greet you, and he slithers along with his snake body.


When I want to translate a scratchy drawing into a print, I generally do a solarplate etching. 
A solarplate is a light-sensitive, metal-backed plate.  It can be cut with scissors or a very strong cutting board.  It can be exposed using the sun or an exposure box of some kind, and is developed using water.
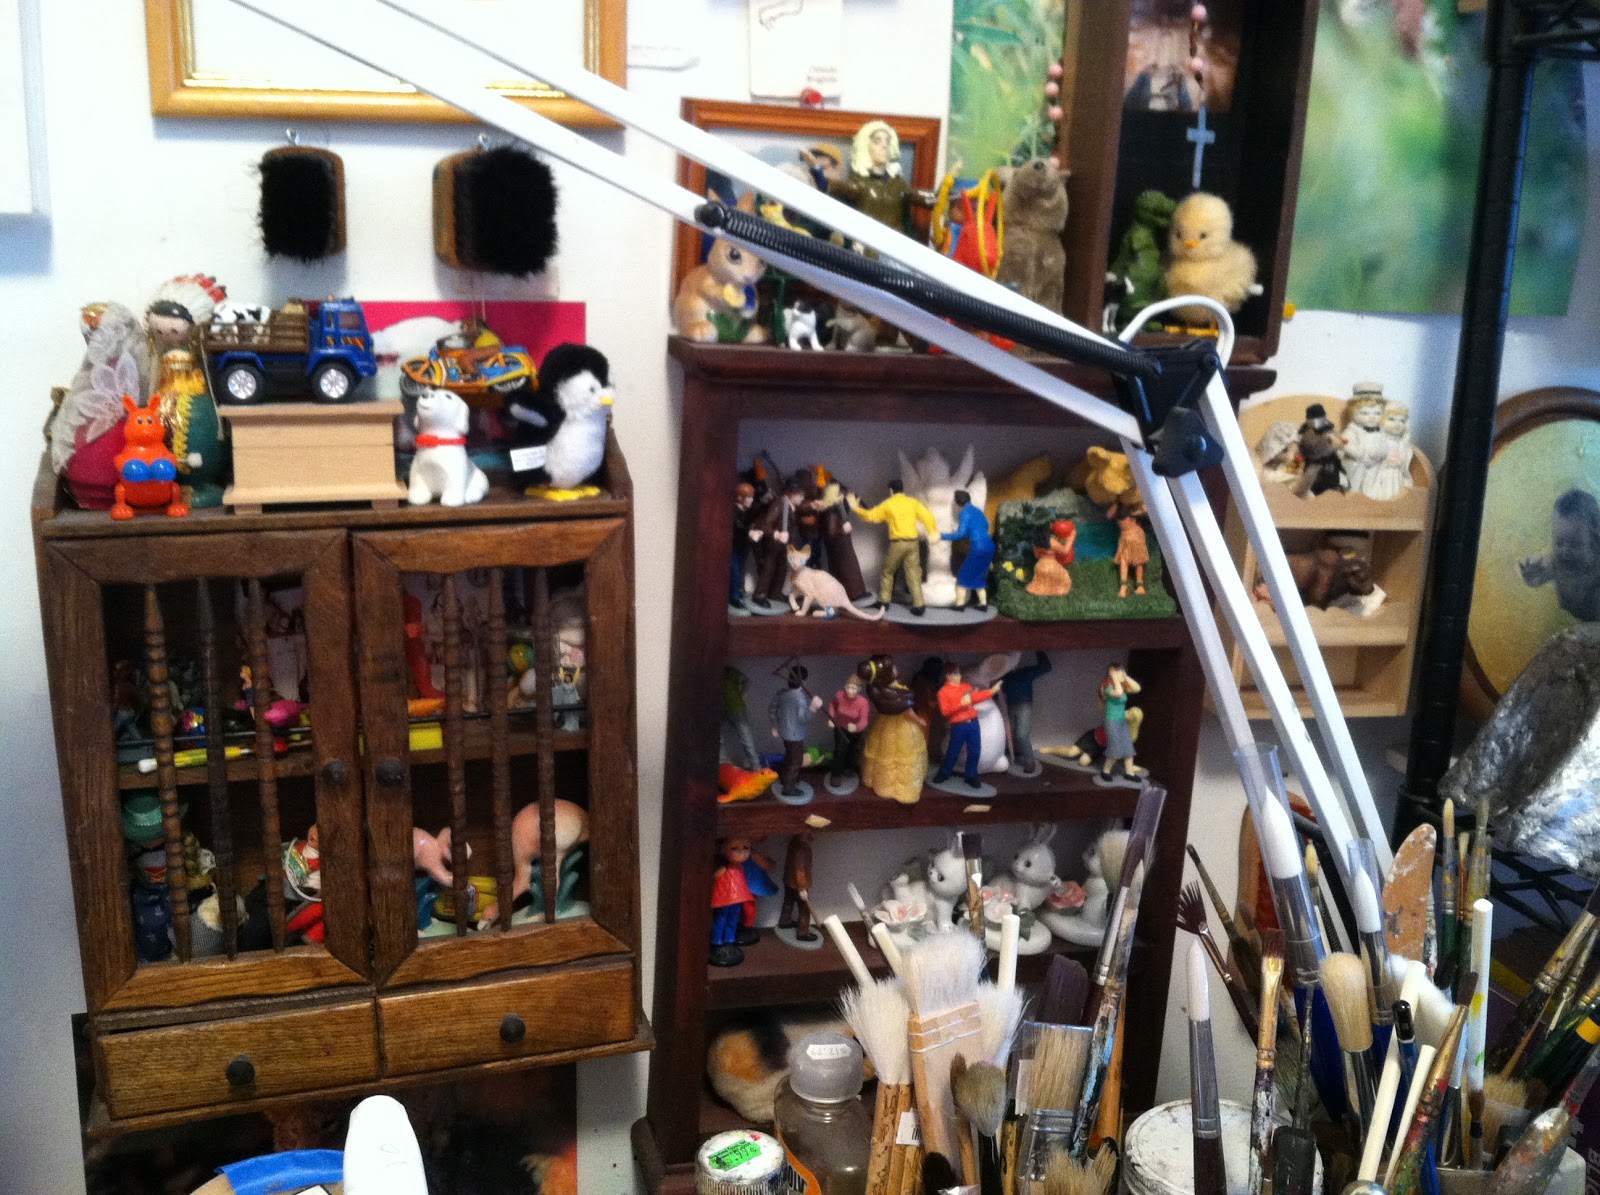
This is a less-toxic form of printmaking which I have done for many years, with a very crude and simple setup in my studio. Below is a photo looking down on the floor. To the right is the "exposure unit", which is a European tanning lamp set atop a cardboard box with a hole in it and aluminum foil around the edge of the hole, so the light shines in the box.  The foil is important cause the lamp can get very hot, even with only a minute or two of exposure. 
To the left is a piece of plywood, a purple piece of foam rubber on top of that, and a thick piece of glass on top of that.  Underneath that glass is where I set my solarplate, face up, and the box w/the tanning lamp is set on top of that.  I look away from the exposure unit when it's on cause some light will escape around the edges.  With the first exposure of the plate, I use a "dot screen" which you can get from http://solarplate.com and other places.  It is helpful to do this initial exposure especially if you have a lot of detail or subtlety, as it helps the plate to be more sensitive to more subtle gradations.  I usually expose it for about 90 seconds, but if you do this type of printmaking you will have to experiment and find what works for you.  For the next exposure, I put a transparency (I have scanned my drawing and transferred it to the transparency) on top of the plate, and under the glass.  The heavy glass holds the transparency flush with the plate.


I use nitrile gloves whenever handling the plate, you don't really want to handle it with bare hands cause after all you are still dealing w/chemicals (you can see the blue gloves in the photo below).  After the exposure is done, I have a metal cookie sheet with a magnetic sheet stuck in the middle of it.  That is helpful because the plate will stay in place while you wash it out.  Put some water in the cookie sheet (not too much), and I have a firm but not hard scrub brush that I use to brush the plate once I put it in the water.  After 2-3 minutes of washing out, I gently lift the plate, face up, out of the water and put on a few pieces of newspaper.  I take one piece of newspaper and put it over the plate, lightly rub over it, then throw it away, repeat until the plate is dry.  This needs to be done pretty quickly.  Then I leave the plate near the window so it will dry with some sunlight helping to harden the plate as well as help it dry, "post-exposure".  The post-exposure is not so critical time-wise, in my experience.  But it shouldn't be left there indefinitely .  I would leave for 20 minutes to a half hour, then put in a plastic bag and put in a box so it will be out of the light until I am ready to use it for printing.  
 
 
As you can see below, it appears that the plate expsure was good.  You don't want the lines to be TOO deep, but you don't want them to be very faded either, or they won't take the ink properly.  I wing it as far as exposure times and washout times are concerned, because I have done these plates many times.  I suggest you read Dan Weldon's book, "Printmaking in the Sun," or take a class with him or someone else who teaches it, before trying this on your own! There are many variables to deal with and I'm just giving you a summary of the process.
 
Of course, I suddenly have a few other projects to finish before I get to printing this but that will give me a little time to think about the printing - color of ink? paper? will I do some hand-coloring?? we'll see what happens next :)


Sunday, February 24, 2013

The Power of Simplicity: Pencil, Ink, and Emotional Connection


I usually have at least a couple of types of projects going on in my studio.  And even if not, I often will take a break from whatever project I am working on to do some work that is more immediate.  Above you will see I have made a little corner space to do some small drawings. 
 
Drawing helps me to re-connect with what feels like the heart of the work that I make.  And what subject matter could be more suited to that for me than animals, which whom I spend a lot of time (my other part of my life being the therapeutic work which I do with animals) and with whom I feel a very natural, deep and vital connection.  I have an ongoing series of drawings with animals which most often are done using a combination of sumi ink, watercolor, gouache, and aquarelle pencils.
 
The animals who I work with (including my own, of course) from the shelter and privately touch my heart every day.  One of the cats who I spent a lot of time with recently was named Pallino.  He was at BARC shelter, where I volunteer.  Animals arrive at the shelter in widely varying states of health.  He came in with advanced kidney problems, and the shelter did all they could to help him remain as comfortable as they could, giving him a lot of love and care.  However, it became clear a couple of weeks ago that he was nearing the end of his journey on this earth.  I spent a lot of time with him, especially in his last days, sharing Reiki energy with him and sending him images of being surrounded with light and love.  From him, I felt he was so soulful, so sweet, so accepting of his condition and filled with gratitude for any attention and love. 
 
After he was let go, though I knew it was his time, I still felt so sad and felt his spirit all around me.  I had a few photos of him, which I often use for inspiration.  I felt I wanted to see what I could do to try and capture some of the spirit of this deep soul with whom I had shared these quiet moments. Looking into the eyes of the animal from the photographs that I have of them is often a way to access that connection if I am not feeling it already.
 
Most often, when I am able to connect with the feeling from the animal, the drawing makes itself.  When this was done, it felt that he was inhabiting the drawing.  When I can look at the drawing later and truly feel that the spirit of the animal comes through, I know that it is done.  If I am unfocused and it doesn't feel right, I usually will just try again to get to that place in my mind and heart, where I know it will be possible for the drawing to come forth.
 
Thank you Pallino, much love to you. . . .


Monday, February 18, 2013

A Sidestep: From Paint to Colored Pencil

Above:  on the left is the finished drawing, to the right are the art stix and colored pencils.

I often find it is interesting to try similar subject matter in several different media, and I learn something every time I try a different medium - is this able to show another side of this subject? is another medium able to better translate what I am trying to get across? 

Anyway, my Valentine gave me some beautiful colored pencils from Utrecht, and of course I had to try them right away.  I have been working with images of a girl in different states of motion, trying a variety of body positions, colors of her dress and colors of background.

Working with a pencil has SUCH a different feeling than working with a brush.  And, as I have been focusing on the strappo monotypes, which are made of acrylic paint, it has been a little while since I worked with a pencil, much less a whole array of colors. 
So, as I worked, I started to experiment with shading, combining different layers of color, etc. And ways of creating the layers of color.  So different to feel a small point (or even the side of a pencil) rather than the smushy brush at the end of what you are holding.
For the large area of the background, I felt I wanted a more solid color feeling, so I included layers of Prismacolor art stix, which are the shape of conte crayons but made of colored pencil material. In the photo below, you will see that I have added more shading and layers (sorry the light is not the best on the photo above, but you can still get the idea). 
I started to feel it was getting more of the feeling I wanted, as it had felt a bit too flat before. 
I actually don't mind some types of flat, but the word flat can sometimes mean to me more than flat in the physical dimensional sense, rather a flat that means that the piece is lacking the life that I want in it.  And, because I work so much from intuition, sometimes it takes trying a bunch of things before I arrive at the feeling I want.  Whereas, other times it just comes out right. And those times it feels like someone else did it!
So, back to the task at hand. Even with more layers and shading, I still wanted at least some parts of the drawing to look more smushy.  Soooooo, even though the pencils and art stix I used are not "aquarelle pencils", which are the type that blend well when you use a brush with water on them, I did use a brush with water on it on the background.  I kept wanting more of a blend, and wanted to see what would happen, if anything.  You can see in the photo below, especially around her head, the color is more liquidy-looking.  So it did blend things in places. 
And now it does have more of the feeling I was seeking.
 
I'm looking forward to trying some more things with these pencils to see what happens there.  Meanwhile, the strappo monotypes are continuing to be made as well :).


Thursday, February 14, 2013

Welcome to My Studio


 Hi folks!! This is the first post of my art blog. In this post I will give you a first glimpse of the place where I make my work. It evolves and changes according to the medium that I am working in, which changes as the muses dictate.  Above is one of my sculptures, and to the right you can see some shelves where I have some toys, some finished work, etc.

Above is a shelf with a few gilded sculptures which I've made in the past few years.  I work in a variety of media:  drawing, sculpture, mixed media, sumi-e ink painting, and many types of printmaking processes.

I will not be cleaning up my studio for the purposes of this blog, other than the usual weeding out and clearing away of things so that I can work!  I seem to thrive in an environment where there is a lot to look at and possible materials to choose from, and I don't imagine that changing any time soon - although from time to time I wish I had more space and could manage to have a more sparse atmosphere :)


I have a small printing press (you can see the crank on the left hand side of the picture above), which was made by Faust (the same company that makes the inks) and is a wonderful simple press to use - as far as I know I don't think they are making these presses any more.
At the moment, anyway, the press is being used for a table because the type of prints which I am doing right now do not require a press.  They are called Strappo Monotypes.  This is a process that was developed and taught to me by Harold Garde, who is a wonderful artist!  Check out his work at http://haroldgarde.com/.
OK, back to the studio here.  On the press bed, to the left hand side of the picture above, is a Strappo in progress.  You will see toys throughout my studio, as I often use them for inspiration for my work.


Above to the right is a finished Strappo.  They are made by painting with acrylic paint on glass, which is built up in many layers, then transferred to paper, panel, canvas or whatever other surface you may want to try.  In this process, the first brush strokes you put on the glass will be the top surface of the finished print.  So you are creating the image backwards. This is a very interesting way to make an image! And helps free my mind in a certain way because I am not following familiar patterns of making an image. 
The one shown here also makes use of collage.  I painted matte medium on the glass, then put the ink drawing on the glass, more matte medium, then began building up the paint.
I'll talk more about the Strappo process in later posts. 

Above are some more of the toys and paintbrushes that populate my studio.
Right now I've got to get back to work, and then will be going to the animal shelter where I volunteer, BARC Shelter in Brooklyn (http://barcshelter.org).  If you want to see what I am up to with the animals, feel free to check out my animal site, http://healingenergyforanimals.com and my animal blog, http://sarahsuricat.blogspot.com.
Happy Valentine's Day everyone!